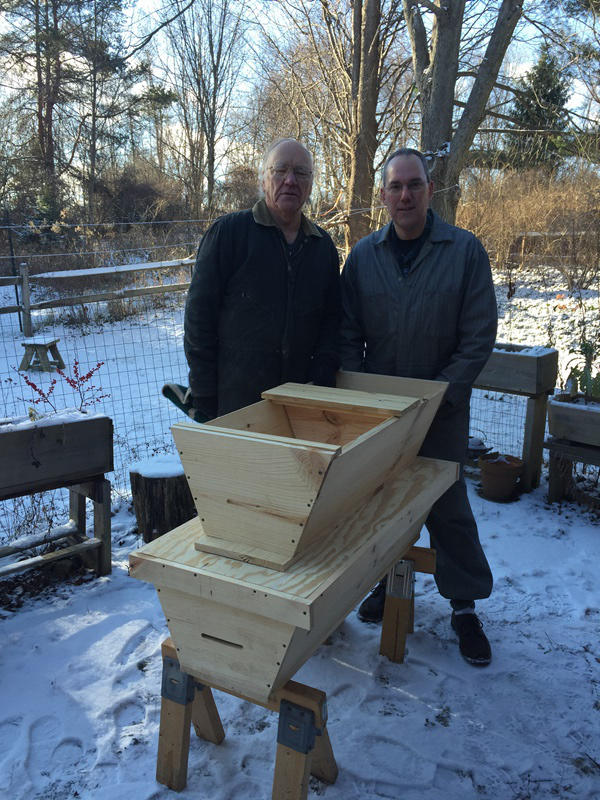
 An update on my recent activities, from my trip to Ithaca, New York through our current snow storm. The trip to my parent’s was a great success. My lovely wife and daughter stayed behind so it was just me and the ‘rents – it’s been awhile since that has happened! Building the top bar hives was a bit of a challenge, so I really appreciated having dear old dad to assist. We built two hives based on the plans from my prior post, and had a nice time in and around Ithaca. We even visited local beekeeper Duane Waid and toured his honey processing facility. More on that another time, perhaps.
This week we prepared for the big snow storm currently hitting our area, so I have a short update on this as well.
New Hives
Getting the measurements exactly right is always difficult, at least for me. My dear father had cut some of the boards in advance, though it turned out my directions were not as specific as I might have hoped. So we cut a few new boards to make it all work.
The end template is perhaps the most important, as it dictates the size of the comb. In order to swap comb between hives, you really need the inside of your hives to be the same. Pretty easy with Langstroth frames, with a top bar hive you are on your own.

The two hives after our first assembly.
So we cut the ends, the sides, and the bottoms, and put them all together. Wyatt Mangum recommends using screws with no glue. He argues that you may need to replace a broken or rotting board in the future, and it is a lot each to do this if the boards are not glued together. So we followed this advice, which turned out to be rather fortuitous, as once we assembled the hives two important facts became apparent.
First, we used the wrong screws. We carefully purchased stainless steel decking screws, but without thinking used some drywall screws my dear father had on hand. Right after we completed the second hive my dear mother came down and asked “Did you need these screws?” Oops.
Second, I suddenly understood why Wyatt Mangum recommends 3-foot sides. Adding an extra six inches makes the hive a bit awkward to move. The wide 19-inch top creates a large cavity, I’m sure the bees will love it; and the longer size allows for a lot of comb, at the expense of a bulky hive. Dr. Mangum used 5-foot hives for honey production, I can only imagine dealing with an additional 18 inches. My 3.5 foot hives seemed a bit too big.
There was some debate on whether to replace the screws, though after some anguished moaning it was a rather easy decision. We removed the drywall screws and replaced them with decking screws. Since we had to take the hives apart, we also cut one hive down by six inches. I probably should have made both of them shorter, but the idea of comparing the two sizes seemed appealing at the time. We left an extra two inches on the new bottom board to create a small landing platform.
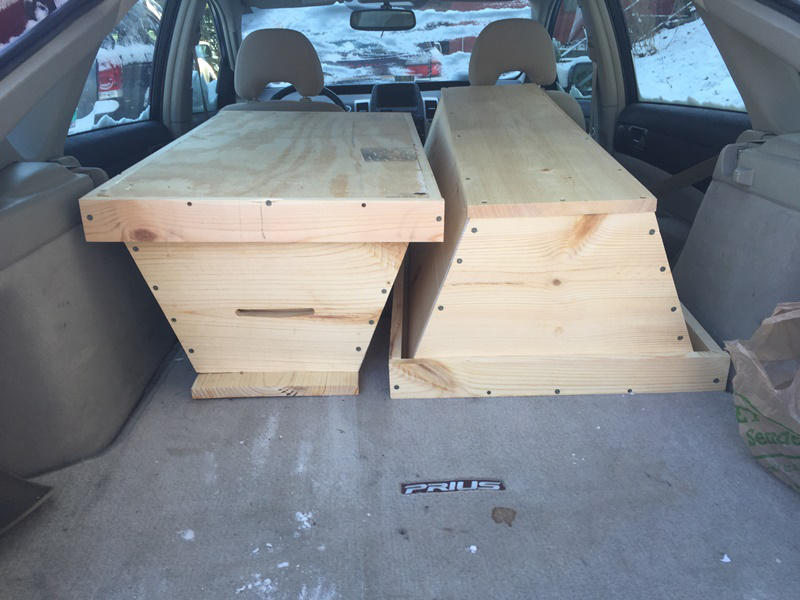 The hives just barely fit into the back of my Toyota Prius (whew!), and made the trip safely home. You can see the landing board on the shorter hive in this picture, and the roofs made from 1/2 inch plywood. Said roofs still need a waterproof cover. If you have any suggestions please add a comment, otherwise I’m thinking roofing paper or metal of some sort.
Looking forward to using these in the spring!
Existing Hives
Speaking of hives, you may heard about the massive snowstorm visiting us as I write this. We are very much in the center of the action, with two or more feet of snow expected in the next two days. It started snowing this afternoon, and at 11 pm we have 8 to 10 inches on the ground already.
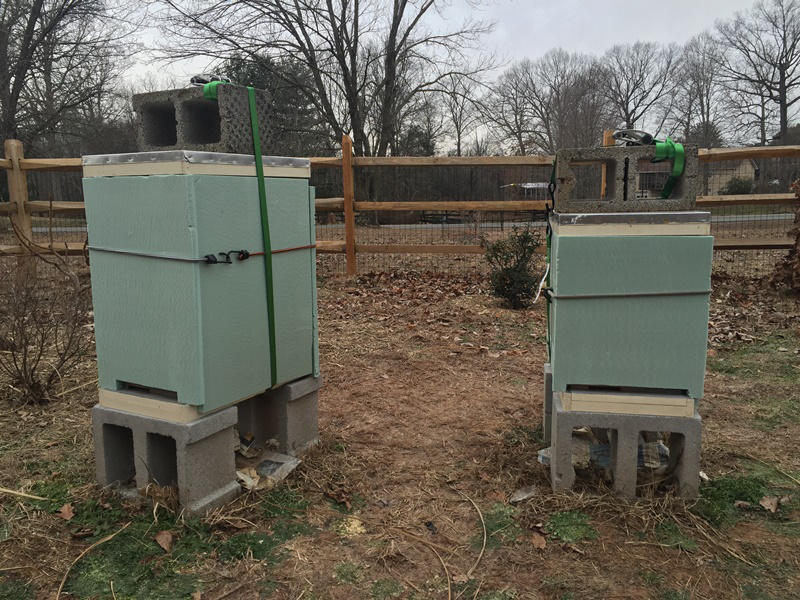
The Langstroth hives as of this morning.
Our temperatures have been quite cold lately, which naturally makes me fret about the state of the bees. The hives are not well protected from wind, especially, as the holly bushes I planted apparently need more than a single summer to gain some height.
With the storm bringing strong blustery winds and blizzard conditions, I took advantage of the opportunity to act on my worriedness.
So last night I cut up the remaining foam insulation sitting in my basement. This was used to cover the top of the hives this past fall. This morning I tucked the bees in for the storm, battened down their hatches, and wished them well. I cut an opening for the entrance, and left the rear opening from the shim exposed as an upper exit. My BroodMinder sensors continue to tell me the top of the hives are around 40 F, so I assume the bees are inside working their magic.
Unfortunately I only had enough insulation for the Langstroth hives. The Top Bar Hive is longer and hopefully a bit more of a buffered from the wind. The top is insulated and the entrance holes are shielded from the wind, and for some reason I have been less worried about this hive.
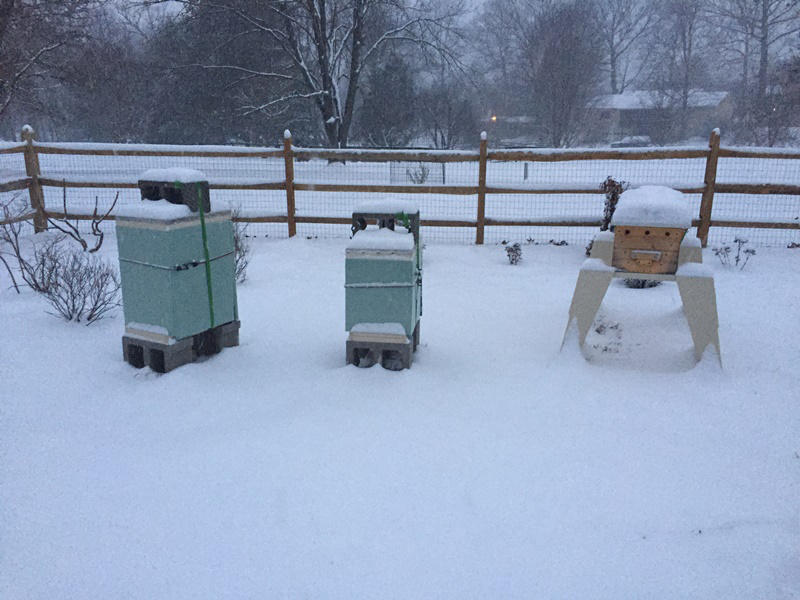
The image here shows the hive after the first four hours of snowfall. You can see that the front entrances on the Langstroth hives are already covered with snow, thank goodness for the upper exit.
Depending on where you live, the term Beehive House may mean something different. In the United States, the historic Beehive House is an official residence of Brigham Young, an early leader of the Mormon church. Beehives were an important symbol for the early Mormons, who saw the industrious bees as symbolic of how a productive society should operate.
In Europe and other areas, primitive dome-shaped homes are referred to as Beehive Houses as well. Here is a link that shows beehive houses in Syria.
Finally, some beekeepers, especially in colder climates such as Germany, build houses in which to store their beehives. So these are literally beehive houses, though for some reason they are called bee houses.
For me, I’ve been building beehives and insulating beehives, so the name seems appropriate. Wish us luck with our snow. I’ll try to snap some pictures when the weather calms down a bit.

Your new hives look fantastic! Well done!
I’m really bad with measurements, too. One thing that works well for me is that I make my ends and follower boards the same size. When I attach the sides, I screw them into the edges of the boards for the ends (instead of attaching the ends to the edges of the sides.) The thing I like about it is that I can make up lots of ends/followers and don’t have to worry about cutting more than one size.
It will be interesting to hear how your two hives compare. I’ve actually been considering making mine *longer* because 4′ is too short for my spring flow. On the other hand, I have a friend 40 miles away with volumetrically smaller hives, and 4′ is too long for him. It’s so crazy. No wonder you ask 5 bees a question and get 6 answers.
Good luck keeping the girls warm and snug!
LikeLiked by 1 person
Thanks, Julie. If this snow ever melts I’ll next have to figure out how to move comb from my old smaller top bar hive into the new one. I’m thinking lots of ribbon.
Stay warm!
LikeLike
For roofing we use metal flashing although it is hard to fold over an edge sharply and you may find it hard to get wide enough for a single piece to cover your rooves.
LikeLike
Thanks, I was looking at 24″ flashing earlier which might fit. Do you paint it or leave it unpainted? I’ve never worked with it before.
LikeLike
It is paintable but we leave it unpainted and reflective for summer. For winter we cover it with black roofing felt to absorb solar warmth. The felt is just held on by residue-free duct tape. When we have none of that even blue painter’s tape serves surprisingly well.
If you do want to paint it then just sand a little to roughen the surface before priming and painting. Enamel paints may last longer than latex but the pros at the paint/hardware store should know best.
https://theprospectofbees.wordpress.com/2012/10/31/building-beatrix-a-roof/ includes our attempt at dealing with folding flashing over an edge and attaching. A genuine flat bread.
For our later hives the roof is a sloped sheet of plywood with U-channel friction-fit around the perimeter to hold the edge of the flashing. A bead of silicone caulk runs around the join. No bending. Much easier. Sadly not applicable to your beautifully made rooves.
LikeLike
Thanks for the additional detail, and especially the link. I don’t have a good staple gun (yet) so may use your tack approach. Perhaps my February project.
LikeLike